One thing that I can assure you with utmost confidence is the fact that – you are no longer safe. I say so not in terms of your financial status, but in the way you browse the Internet. Your every single browsing activity is traceable. So, the question arises – How to stay safe while browsing? The answer is to use Virtual Private Networks aka VPN to get the best browsing experience.
Defining Virtual Private Networks (VPN)
There are many definitions available for Virtual Private Networks on the Internet. However, one can define them simply in one line as:
A network service that creates a safe network enabling you to browse internet anonymously on Internet both on private and public networks
For newbies, I further classify the definition as:
Virtual: no physical connection between the parties exists. The comm. relies completely on the Internet
Private: transmitted data is fully confidential to prying eyes using encryption and secured tunneling
Network: it specifies the mode of communication. It can either be either of the categories:
- private/public
- wireless/wired
- Internet or any other resource applicable
Benefits of Using a VPN
No doubt that the benefits are endless, but let me give you only the ones that matter:
- You stay anonymous
- Your data stays safe and secured
- Gives you the legal authorization of content that otherwise comes with limited access
- Let you decide the rights of geolocation i.e., decide which websites should have access to your location
Caution: Just because you are anonymous, doesn’t mean you can browse Dark Web in a hideout. Both are completely different from each other. Follow the link to explore the hidden internet – the Deep web in a detailed format.
Working of VPN
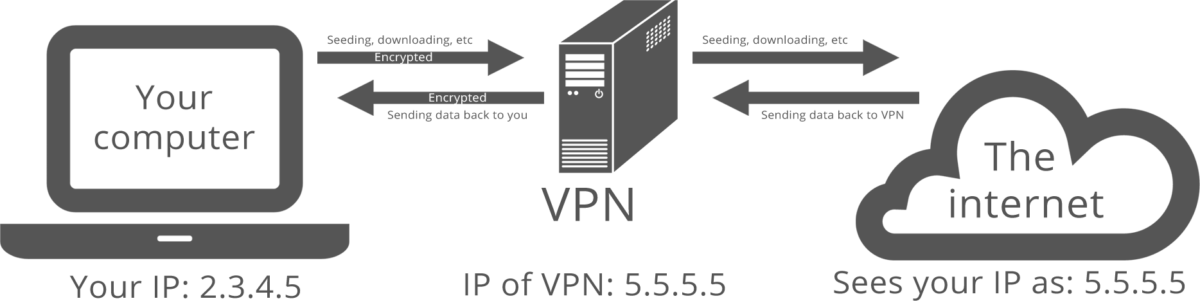
Other than definitions and benefits, it is also important to garner knowledge of other significant aspects related to our blog topic. If you find Google language a little hard, worry not and follow the image followed by a list of 3 pointers for a better understanding of the working in plain simple language.
- When your system connects to a VPN service, an exchange of trusted keys takes place between the system and the server
- The communication gets encrypted as soon as both systems are verified
- A secured connection allows encrypted transfer and receiving of data
Insider Tip: Consider the features. the price, the number of servers (and their locations), and majorly the connectivity protocols before you make a choice. DO NOT TRUST EVERY VPN. More than anything, it’s simply your provider that counts.
These were just the basics. The post now enters phase II i.e., INSTALLATION PROCESS. Do take note of the OS you are using and accordingly follow up the steps for a hassle-free experience.
How to Start/Install a VPN Easily
- Perform a Google search and choose a VPN service that meets your requirements in the best possible manner
- Register yourself as a permanent member by signing up for free or by paying a subscription fee
Voila! You are now a registered member. Just follow the steps (mentioned below) to set up a third-party VPN on your system:
- Download the installation file (.exe format)
- Right click the file and choose Run as Administrator to obtain admin rights while installing
- In case Windows default User Account Control (UAC) pops up and asks for a password; type it in and click on YES to continue the setup
- Fill in your VPN login details once the installation is over. You can also explore the options if necessary and finally click SAVE
- Once setup gets completed, follow the steps (OS-specific) to begin the manual installation process:
For Windows OS
- Use websites like vpngate.net / opengw.net / nvpn.net to find a range of addresses for connecting and pick one address out of the list
- Click on the Start button and type VPN (in small case) in the search box
- Click Set Up a Virtual Private Network (VPN) connection to initiate the process
- Remember the address (server) you chose? Type its IP address or domain name in the assigned boxes and click NEXT
- Finally, enter the keyword VPN (in small case) as login credentials for both username and password
For iOS
Setting up a connection for the iOS platform is simple and quick. Just follow the below two steps and you are good to go:
- Follow the path as follows: Settings >> General >> VPN
- Click on Add VPN Configuration
- Enter the IP address (server) & the Account Name for completing the connection setup
For Mac OS
People usually consider Mac OS to be trickier. However, setting up a VPN connection on Mac OS is an easy affair just like Windows and iOS. Read along the steps carefully to avoid any hassles:
- Firstly, get hold of an address (from the list) that you can connect to. Take the help of sites (mentioned above in the Windows category) for further assistance
- Find out System Preferences and click NETWORK under it
- Find the ADD (+) option at the bottom of the list and choose VPN from the pop-up menu
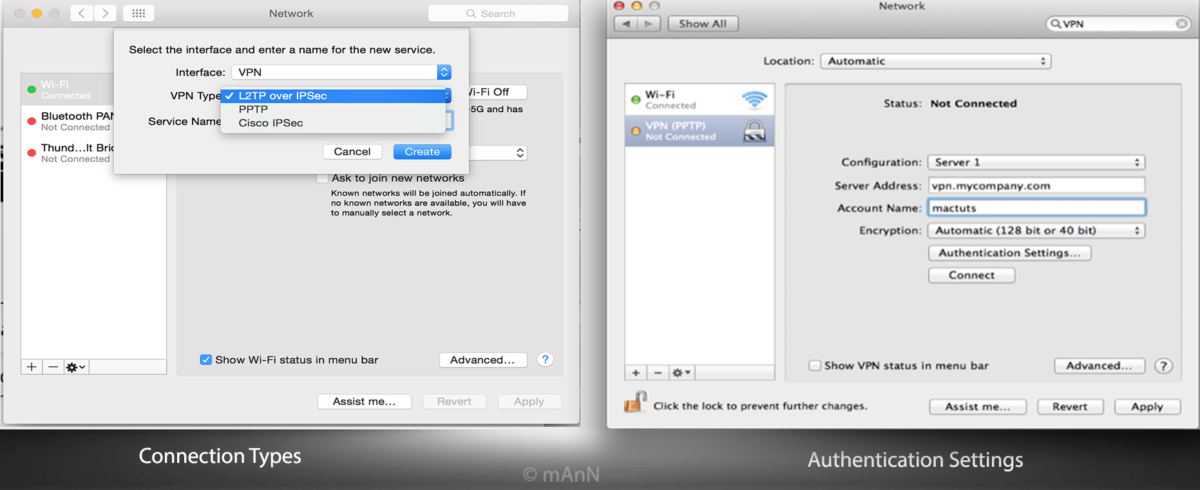
- Next, choose the type of connection you are setting up from the pop-up list. Usually, you get either of the three options: PPTP / L2TP over IPsec / Cisco IPsec
- Under Account Name enter VPN and then click on Authentication Settings
- Enter VPN (in small case) twice for Password and Shared Secret
- Click OK followed by a click on CONNECT to establish the connection successfully
Also read: 5 Free Virtual Private Network Services
Conclusion
Though I do not encourage using VPNs, staying anonymous is a personal choice. However, if you still choose anonymity, browse legal content online and avoid surfing the rest. The INTERNET is an open space and anything you browse gets recorded which you can never hide permanently.
Enlighten yourself more about VPNs by checking out this TechNet article to understand the functionality of virtual networks.
Already using Virtual Network services? Share your experience with us via the comments section below.